
Shoebill Stork Photography at Mabamba: Camera Settings, Light and Canoe Position
The world's finest shoebill stork photography is produced at Mabamba Swamp. Nowhere else on earth can you approach a fully wild shoebill to within 15 to 25 metres on a stable platform, at eye level, in the first hour of direct morning light. Understanding how to use these conditions — the low canoe angle, the soft golden light, the bird's extraordinary stillness — is what separates publishable shoebill stork photography from the technically competent but emotionally flat images that result from wrong settings or wrong timing. This guide covers everything you need before you step into the canoe.
The Mabamba Light Window: When Shoebill Photography Works
The most important variable in shoebill stork photography at Mabamba is your arrival time relative to sunrise. Entebbe sits at approximately 0 degrees north latitude, which means the sun rises steeply and quickly. From first grey light to harsh overhead sun takes roughly 90 minutes. Your golden hour is real but brief.
5:50 to 6:15am — Pre-dawn and first grey light: Too dark for clean images without ISO 6400 or higher and significant noise. Use this period to reach your first channel location and let the canoe settle on the water. Listen for bill-clattering to locate birds before you can see them clearly.
6:15 to 7:15am — The golden hour: The single most productive shooting period. The sun is 5 to 15 degrees above the horizon, throwing warm, directional light from the east. When the shoebill faces east or stands perpendicular to the sun direction, every feather detail is illuminated with quality that high-noon shooting cannot achieve. This is the period when the metallic blue-grey sheen on the wing coverts becomes fully visible. Typical ISO in this window: 400 to 1200.
7:15 to 8:30am — Mid-morning: Light is increasingly harsh and directional. Strong shadows develop below the bill and chin. The shoebill's yellow eye begins showing distracting white specular highlights. Shooting remains productive in papyrus-shaded channels where diffused light mimics cloud conditions.
After 8:30am: Contrast is too high for most shooting. Shoebill activity is also declining as birds move into papyrus shade. Most photographers stop shooting shoebills and switch to open-water and papyrus-edge species.
The practical rule: leave Entebbe no later than 5:00am, be in the first papyrus channel by 5:55am and have your camera in hand before 6:15am. Every minute of the golden hour is irreplaceable.
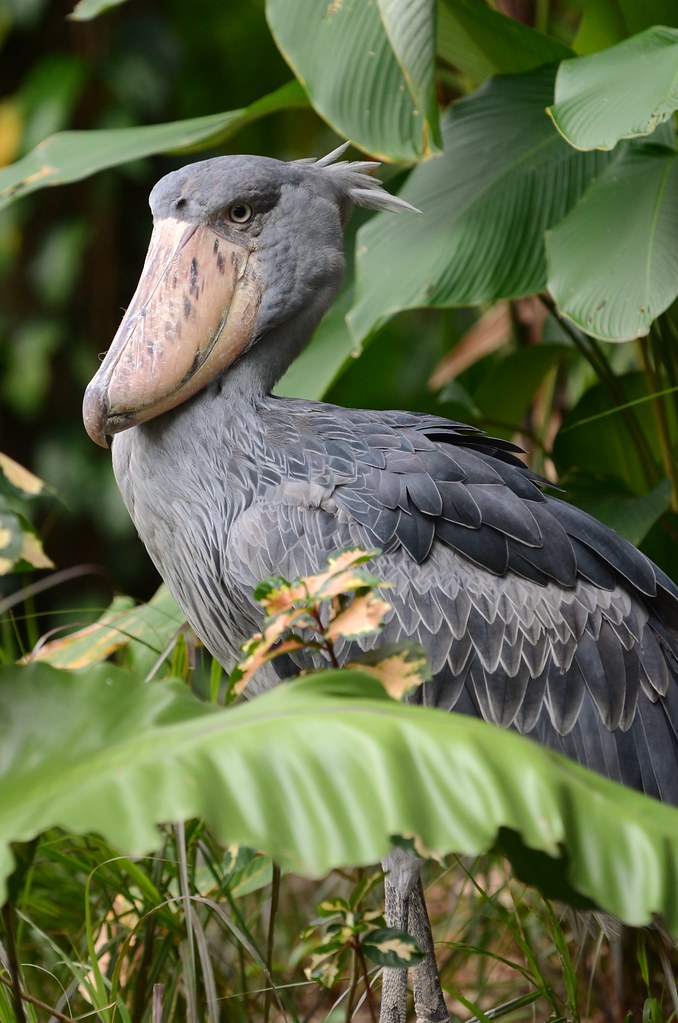
A shoebill stork captured in golden-hour light. Photo: Brad / Flickr (CC BY-ND 2.0)
Camera Settings for Shoebill Stork Photography at Mabamba
The shoebill presents a specific technical challenge: a predominantly grey subject photographed against a green-grey background, in variable light, from a gently moving platform. These settings are field-tested specifically for Mabamba canoe conditions.
Shutter speed: For a stationary shoebill, 1/500s is the minimum to counter gentle canoe movement. Use 1/800s as your standard for standing birds. For bill-clattering — a rapid motion that blurs below 1/1000s — use 1/1600s or faster. For the rare collapse-strike hunting lunge, you need 1/2000s or above to freeze the movement. Never sacrifice shutter speed for ISO on a moving platform.
Aperture: f/5.6 to f/8 gives adequate depth of field for a stationary bird at 20 to 40 metres. At f/4 or wider, the bill tip can be perfectly sharp while the back of the head falls out of focus — acceptable for artistic portrait work but not for full identification shots. For documentary images where both bill tip and eye must be simultaneously sharp, f/6.3 or f/7.1 is ideal.
ISO: During the golden hour, ISO 400 to 800 is sufficient on most modern cameras. Before 6:15am, ISO 1600 to 3200 is typical. At 7am in clear conditions, ISO 200 to 400 often works. Modern mirrorless cameras handle ISO 1600 very cleanly — do not be conservative with ISO at the expense of shutter speed when shooting from a canoe.
Autofocus: Eye-detection autofocus on modern mirrorless systems works reliably on the shoebill's pale yellow eye against grey plumage. Set to the widest zone AF mode that still locks to the eye. For older cameras without eye AF, use a single central AF point aimed at the eye and half-press to lock before recomposing. Switch to continuous AF (AI Servo on Canon, AF-C on Sony/Nikon) any time the bird begins moving or performing bill-clattering.
Exposure compensation: The shoebill's grey plumage and the green papyrus background both read as mid-tone. Matrix or evaluative metering with zero exposure compensation is usually correct. If the bird is backlit by low sun, add +0.7 to +1.0 stops. If the bird is against a bright open-water background, subtract -0.3 to -0.7 stops.
Focal Length and Lens Choice for Mabamba Shoebill Photography
The typical canoe-to-shoebill distance at Mabamba ranges from 20 to 50 metres depending on the specific bird's territory and the approach conditions. At these distances:
300mm: Good for full-body environmental shots. The papyrus surrounding the bird is in frame, showing habitat context. At 20 metres the bill fills roughly 10% of the frame width — useful for showing the bird in its swamp environment but not for detailed portrait work.
400 to 500mm: The ideal all-round focal length for Mabamba. At 25 metres, the bird's head and bill fill one-third of the frame at 500mm. You can produce both environmental images and tight portraits without changing position. A 100-400mm zoom or a 500mm prime covers this range effectively.
600mm and above: Produces tight, frame-filling head portraits from 30 to 40 metres. The bill extends almost the full vertical height of a portrait-format image at 600mm from 35 metres. Outstanding for eye and bill surface detail. A 600mm f/4 prime or a 500mm with a 1.4x teleconverter is the top choice for frame-filling shoebill stork photography.
A beanbag draped over the canoe gunwale significantly reduces vibration at all focal lengths. For 500mm and above, a monopod or gimbal resting on the gunwale reduces camera-to-water motion transmission further. Hand-holding 600mm+ from a floating canoe is possible but produces a noticeably lower percentage of critically sharp images.
Canoe Position: Controlling the Light on the Shoebill
The direction your canoe stops relative to the bird and the sun determines the quality of every photograph you take that morning. The guide controls this instinctively based on experience, but communicating your preferences at the start of the session always helps.
Best position (6:15 to 7:00am): The bird is between you and the east. You are shooting slightly westward with the rising sun behind you. The shoebill's face is fully illuminated in warm light. Its eye catches the sun. Shadow falls away from the camera. This is the position that produces the covers of birding magazines.
Acceptable position: The canoe is to the north or south of the bird with the sun to your side. One half of the face is lit, one half in shadow. In low golden light this creates dramatic side-lit portraits with the characteristic Mabamba papyrus background.
Avoid: Positioning the canoe with you shooting toward the east into the sun, with the bird backlit. The bird becomes a dark silhouette against a bright sky unless you heavily overexpose the background. Silhouettes can be artistic but lose all feather and eye detail.
Tell the guide at the start of the session that you want to maintain 25 metres or more from stationary birds when shooting at 500mm or above. Guides often approach closer than this for standard viewing; photographers need more working distance.
Composition: Using the Shoebill's Shape
The shoebill offers two primary compositions, each producing a completely different image.
Front-facing portrait: The bill occupies the lower half of the frame, the yellow eye meets the lens directly. This is the composition that appears on magazine covers and contest shortlists. Wait for the shoebill to turn and look at you directly — when it does, the eye contact creates an image with genuine emotional power. Fill flash can lift the eye detail in this composition without disturbing the bird at longer distances.
Side profile: The bill extends across most of the frame, the eye is mid-frame, the hunched body posture shows the full hunting silhouette. This shows the complete bill length and the characteristic compressed stance. Green or gold papyrus backgrounds work beautifully in this composition.
Environmental: Wide enough to show the bird in papyrus, morning mist on the water and the swamp sky reflected in the dark channel below. These images tell the story of the place and the encounter, not just the species. These are often the images clients treasure most.
Frequently Asked Questions: Shoebill Stork Photography
What camera do I need for shoebill photography at Mabamba?
Any modern DSLR or mirrorless with a 300mm or longer lens produces good results. APS-C cameras gain effective reach (a 400mm on APS-C equals 600mm field of view on full-frame). Eye-detection autofocus is valuable but not essential — the shoebill is largely stationary and manual focus confirmation works.
Can I use a mobile phone for shoebill photography at Mabamba?
At 5 to 15 metre distances, modern phone cameras produce usable images. At typical canoe-to-shoebill distances of 25 to 40 metres, phones produce good record shots but not publication-quality results. Bring dedicated camera equipment if shoebill photography is a priority.
Is flash allowed for shoebill photography at Mabamba?
Direct flash is prohibited at Mabamba and would disturb habituated birds. Weak fill flash from a camera's built-in flash can sometimes lift shadow detail on heavily side-lit subjects at 40m+ range, but should be discussed with the guide first.
What is achievable in terms of image sharpness?
With a mirrorless camera, 500mm+ lens, beanbag support, 1/800s at f/6.3 ISO 800 in the 6:30am golden light, images regularly achieve 20 to 30 megapixel effective resolution and are suitable for large-print output or magazine cover crops. The limiting factor is typically mild canoe motion and atmospheric shimmer after 7:30am.
For the complete visit-planning walkthrough, see our guide on how to see the shoebill stork, and review our canoe etiquette guide for the approach-distance rules that also govern photography positioning.
Contact our team to book a photography-focused Mabamba canoe trip with pre-dawn positioning, guide briefing on your equipment and extended time at productive shooting locations.